_edited_edited.png)

Not only do we think its great that you want to fix your weapon yourself, we actually require all of our advanced athletes to know how to do it! So here's a video! Down below is a step by step instruction and then below that are some tip diagrams that might help you better understand what you are doing. Please feel free to text the coach or ask if you need help. Remember that everything is harder without the right tools and without functioning parts. If something isn't working well, most often that means you need to replace a part. Usually with weapons, that means replacing the entire point.

There are different brands of tips/points. Usually the word "point" refers to the entire top section (left) and the word "tip" only refers to the actual moving button. Points range in price from $9-25. So check which one you have first and double check with the coaches.
Materials Needed:
-
Acetone in a metal tube (to remove old glue)
-
New foil wire appropriate for the foil point (e.g., French or German)
-
Foil point setter
-
Duco or Super glue
-
Bending jig
Clean the Blade
Unscrew the complete point, and pull as much wire out of the groove as possible. Then clean the blade groove of all bits of old wire and glue by soaking the blade in acetone to dissolve the old glue.
Disassemble the Point
Be sure not to lose the parts (tip, pressure spring, tip screws). Using a magnetized screwdriver, disassemble the point over a white towel or magnetic bowl to help minimize the loss of parts.
Push out the old metal "contact" (looks like a top hat in a plastic cup) and insulating cap using a heavy straight pin. With some of the French contacts, there is also a spacing ring which must be removed.
Straighten the Wire
Unwrap the new wire and straighten any kinks that it might have. Be sure to remove any twists.
Insert the Wire into the Barrel
Only insert 2" of the wire through the front of the barrel, making sure that the wire lies in the blade groove, before screwing the barrel onto the blade. The wire must be able to pass smoothly through this groove with the barrel screwed all the way on. If either wire gets caught or cut, you will still be able to use the wire; if you have pulled both wires completely through the barrel before tightening it, and one gets cut, you will have to buy a new wire.
Tighten the Barrel
using appropriate wrenches, tighten the barrel onto the blade, making sure that the wire can slide easily back and forth through the barrel. Over-tightening the barrel will cause it to split.
Seat the Contact in the Barrel
gently pull the wires through the barrel until the contact sits flush with the front of the barrel. Then with the point setter, gently push the contact into the barrel while simultaneously pulling gently on the wires to keep them straight. Keeping the wire straight minimizes the chances of a kink developing which will later cause an unwanted short. Be sure the contact and its insulating cup are firmly seated at the bottom of the barrel.
Optional Step
some people reassemble the point at this point if there is a fear of losing the point's parts, but if you are using a cyanoacrylate glue (e.g., Crazy Glue), reassembling the tip is best left until later.
Laying the Wire
lay the wires in the blade groove, keeping them parallel. Put minimal tension on the wire – just enough to keep the wires straight – and then wrap the excess wire back over itself, using the tang threads to hold the wire in place while gluing.
Glue the Wire
while holding the tang of the blade upward, place one drop of a glue ¼" below the blade's forte-tang junction. You may have to hold the wires against the bottom of the groove with a small screwdriver. You can watch the glue "wick" its way along the wire. After the glue has set, reverse the position of the blade so the tip is upward and repeat the process. To avoid having the glue wick into your point by place the first drop ½" below the barrel. Continue to glue the wire, one drop at a time, until the entire wire has been covered. Using a tissue, rapidly wipe the blade groove to remove any excess glue hastening the setting time (usually less than a minute). Some people, to add additional strength, "top coat" the wires with a coat of glue.
Check the Gluing Job
remove the gluing jig, and "reverse bend the blade," so that the blade groove is on the inside of curve. Any unglued portions of the wires will reveal themselves by popping out of the blade groove. If necessary, re-insert the blade into the gluing jig, and re-glue those spots using a minimum of glue. Remember, the thinner the layer of glue used, the better it holds. Again, rapidly wiping the re-glued area with a tissue to hasten its curing time.
Install "Spaghetti" Insulation
using a file, knife, or sandpaper remove the insulation from the tang ends of the wires, leaving 2"-3" of the wire's insulation closest to the tang intact. Remember, many wires (especially the German) have a clear coat of insulation beneath the cloth wrapping, which must be removed to achieve an electrical connection. Inert the ends of the un-insulated wires through 4" pieces of "spaghetti" tubing and move them to the forte-tang juncture.
Reassemble the Point
it is easiest to calibrate the "travel" of an epee point without the pressure spring in the barrel. Connect the two wires to a test device (e.g., ohmmeter, light box) – or assemble the epee -- and test the functioning of the epee. If, when the point is depressed, there is no indication of a completed circuit, the contact spring needs to be lengthened. If there is a closed circuit, use the 0.50 mm shim to test the travel. Once you are satisfied that the travel is where you want it, reassemble the tip. You may want to replace the pressure spring to minimize the number of times you have to open tip.
Tape the Point
You're Done!! Wiring epee blades is essentially the same process, except you have to be careful not to cross the wires in the blade groove, and, due to the design of many epee blades, you may have to hold the wires to the bottom of the blade groove when you glue the wires at the tang end.

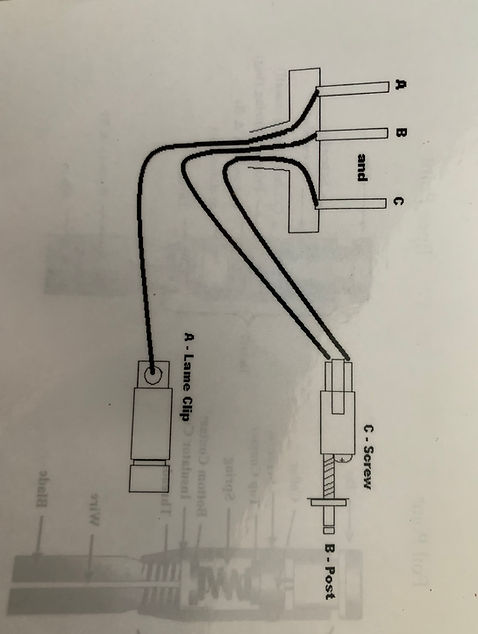
Understanding Your Bodycord
Your bodycord is way more simple to understand than your foil or epee is. The only issue is that in many ways, its a huge hassle. Often the wires are difficult to assemble snugly back into their hard casing. But really, aside from soldering the A line to the alligator clip, a screwdriver,wire strippers and some patience are all that's required. Here's a diagram to help you attach the wires back to where they belong. If your cord is producing a continuous white light on the scoring machine, either the B or C line is disconnected. If you are getting an intermittent light, then your connection is not stable. Your A line is the connection responsible for producing a red or green valid touch light. If you do not register a colored light when your opponent touches your lame, you need to reconnect the A line either with a screwdriver at the three prong end or a soldering iron at the alligator end.